Having trouble exporting a casefile to PDF? Here is a guide to get it fixed.
PDFs can be deceptive. Many of them are simply text on pages, and some have graphics embedded in them. Others still have transparent layers which may contain a variety of things including text, graphics, signatures and other objects.
Table of Contents
First Check the Basics
Getting Started
Identify the problem documents
> Casedo v1.9 and later
>> Steps to identify problem documents (v1.9 and later)
>> Workflow to identify problem documents (v1.9 and later)
> All other versions of Casedo
>> Steps to identify problem documents (other versions)
Fixing problem documents
How to Prevent this Issue in Future
First Check the Basics
Before working through the fix below check the following:
-
- Have you successfully used the export case to PDF feature before? If not, have you checked that you have done it correctly by following the steps in the article How to Export Case to PDF?
- When exporting a complete casefile, make sure that your documents are in the Index. When exporting a whole casefile, Casedo will not export any documents from the Desk Space. If you don’t know the difference between the Index and the Desk Space, take a look at Anatomy of the Casedo Workspace. This is usually the issue if you see the error Nothing in the bundle index to Export. For more information on this see How to fix “Nothing in the bundle index to Export” Error.
- Open another casefile, or even create a new one, and check that you can export from that, if you can’t:
- Check that you are exporting to a folder on your computer that you have previously exported to, and
- Check that the documents in the new casefile are exportable (ie. keep it simple).
If you can’t export other casefiles, contact us. Assuming the issue is ONLY with the current casefile, the problem is likely to be that there is a document or documents that are stopping the export taking place. The task is to identify the document or documents that are causing the problem and fix them.
With the ability to export individual folders and documents that was included in Casedo v1.9, this became a simpler process. Below we have outlined both ways of solving this problem.
Getting started
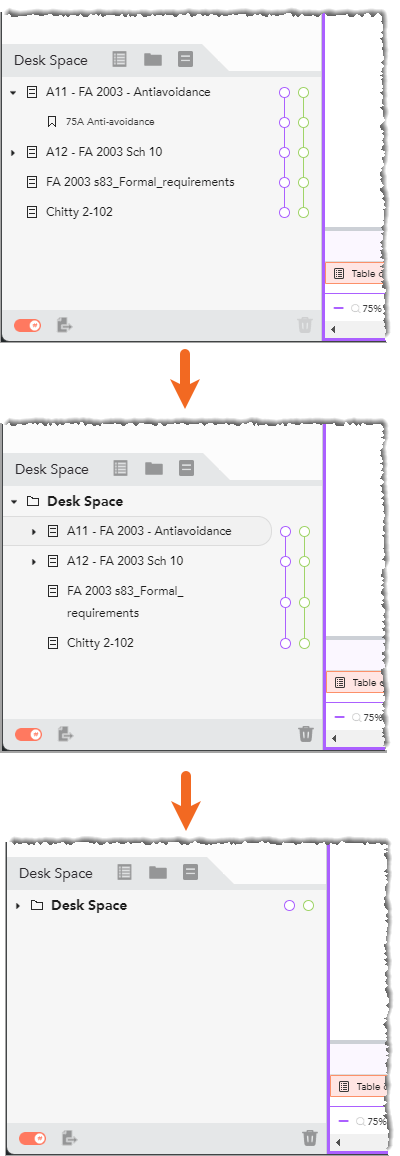
As an example, we will use a casefile with the following document structure:
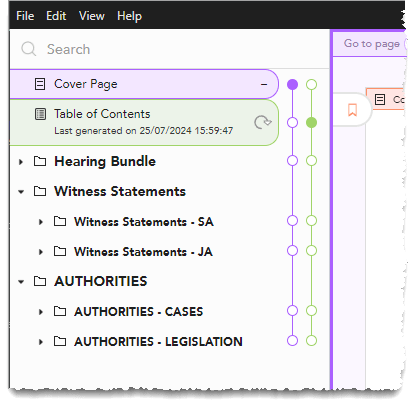
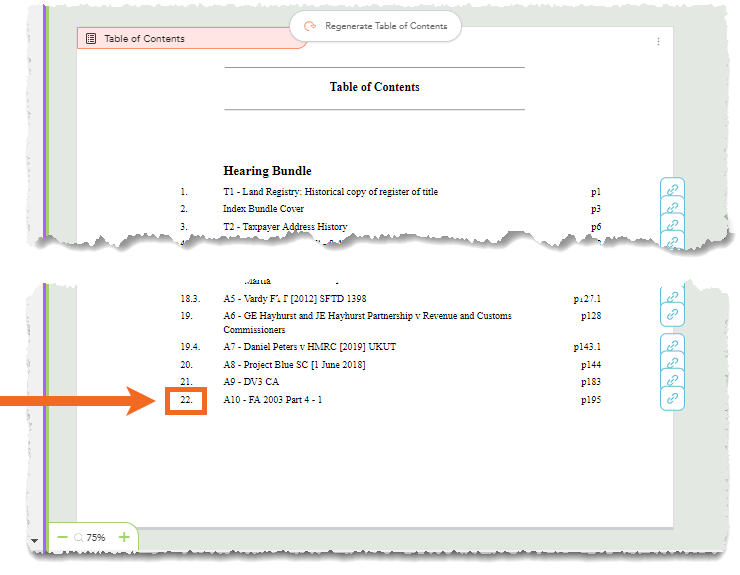
You can see that the casefile is made up of a cover page, a table of contents and three folders containing documents. Two of the top-tier folders have sub-folders. What you can’t see is that the casefile is 222 pages long. The Table of Contents tells us that there are 22 documents in total.
The number of documents in the casefile is not important. However, your casefile may contain hundreds of documents. The methods below circumvent the need to check each document individually.
We are now ready to identify the problem documents. Before starting, make sure you know which version of Casedo you are using. Once you know, click the relevant link below.
Identify the problem documents
Casedo v1.9 and later
We will use the export individual files and folders feature to quickly identify the problem documents, if you don’t know how to use this feature, take a look at Exporting individual files and folders.
NB. If possible, we want to try and leave the Index organised as it currently is, this will save time later on.
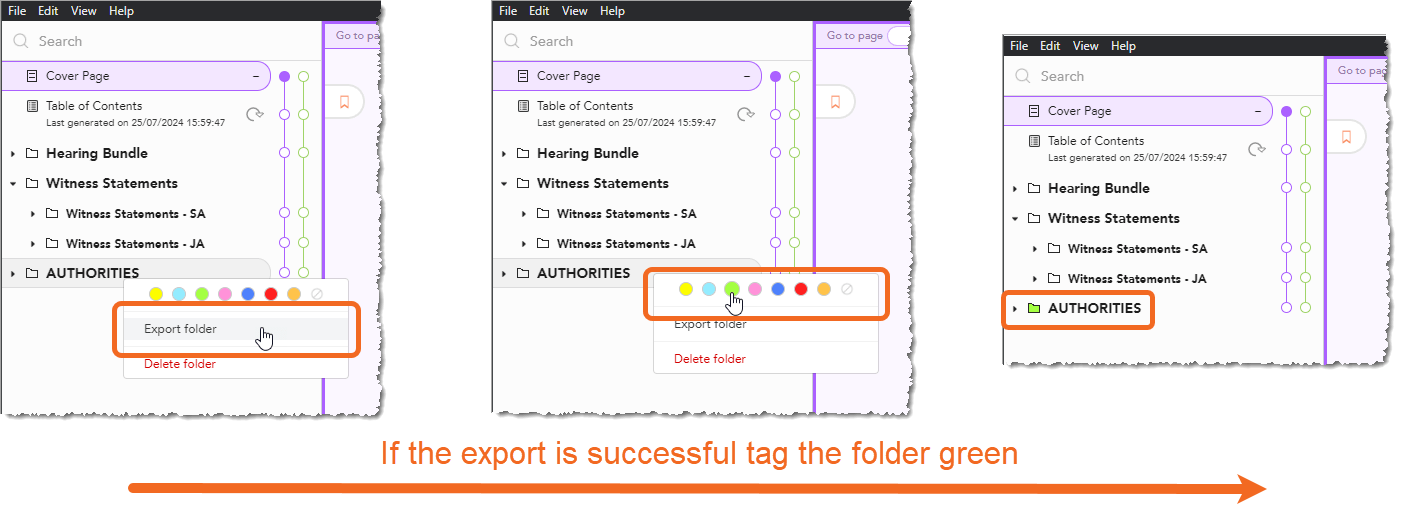
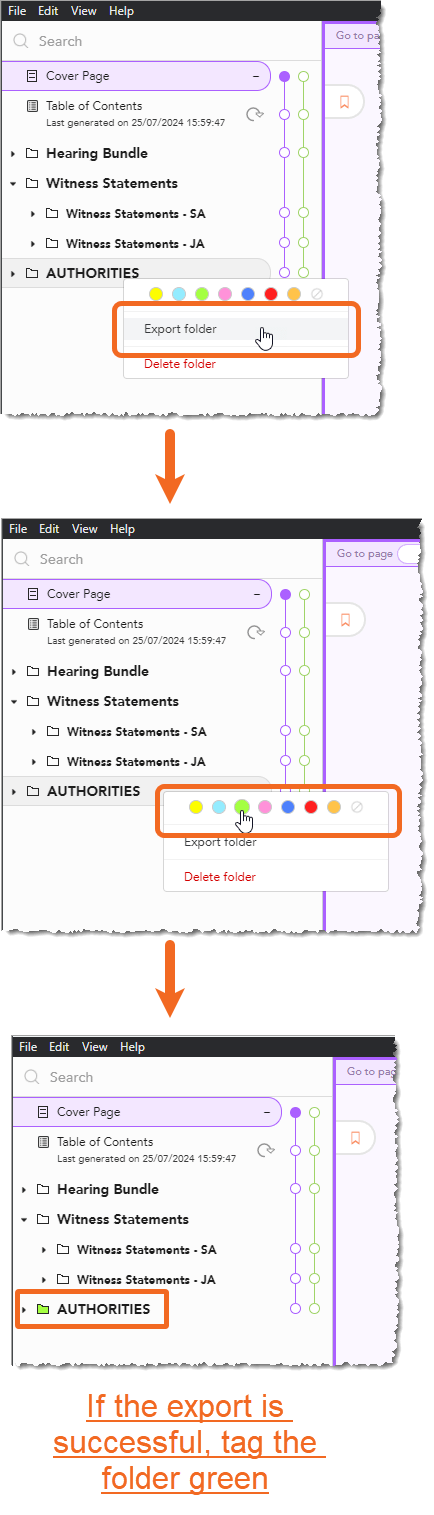
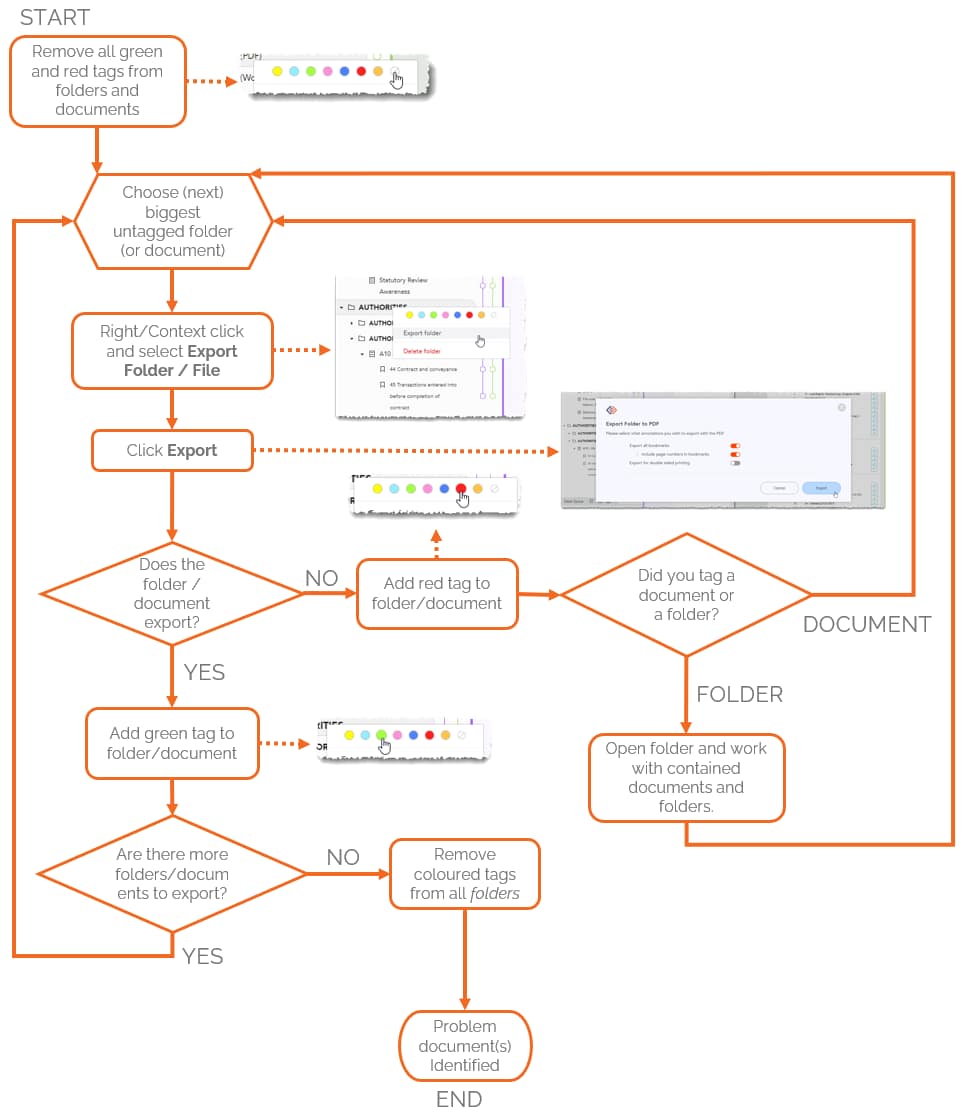
The most efficient way to identify the problem documents is to first try to export the folder containing the most documents. In this case it’s the top level Authorities folder. Once we have successfully exported the folder, we can colour tag it in green (to show that it has successfully exported), and then move on to the next folder. Tagging is only used help keep track of which files and folder have been tested and which are defective. If the export is NOT successful then tag the folder in red and open it, moving through the contents exporting documents and folders to see if they export or not.
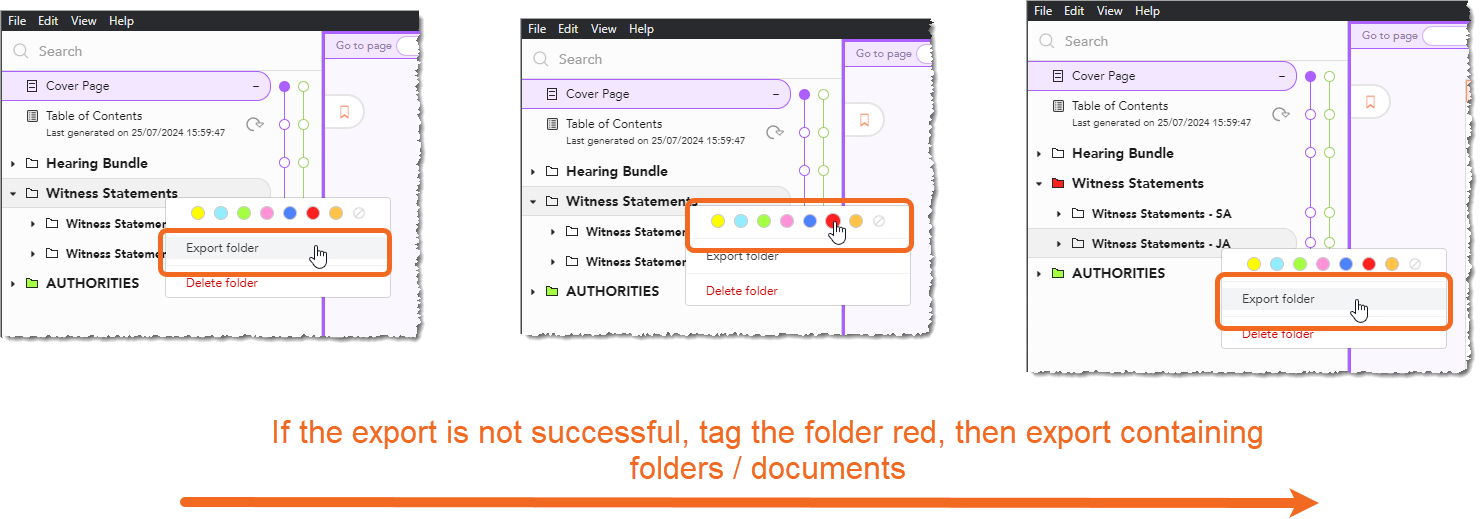
Below we’ve outlined both steps and a workflow to identify the problem documents. Both the steps and the workflow are the same, choose which you prefer to follow. At the end of the process you will have one or two documents tagged in RED that need to be fixed.
Do note that during the steps and/or workflow it could be that Casedo crashes every time you try to export a problem document. Just restart and keep moving through the process.
Steps to identify problem documents (v1.9 and later)
-
-
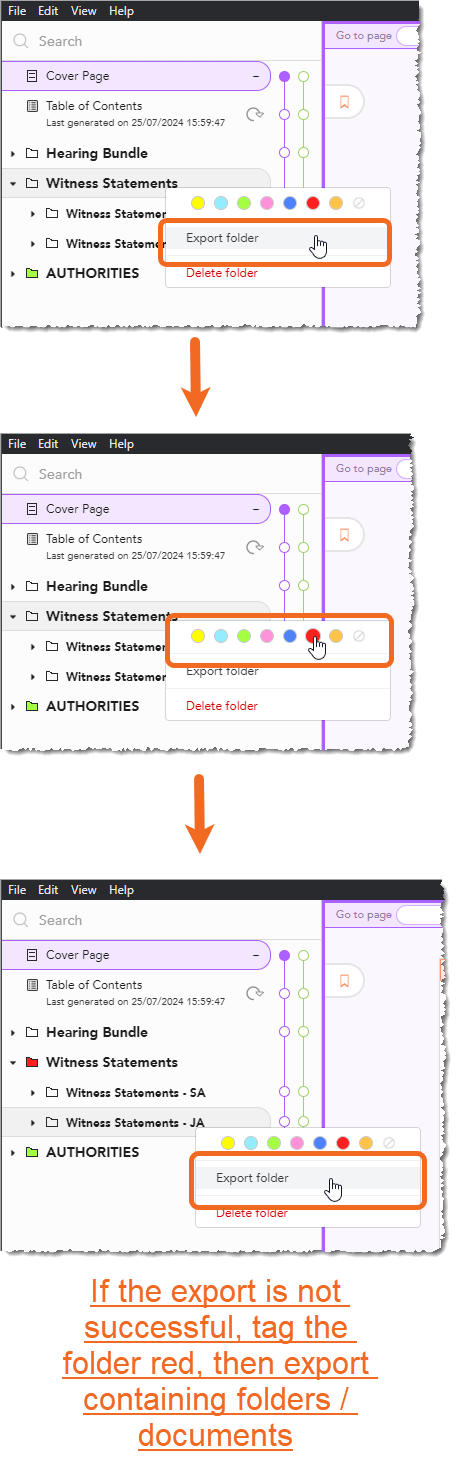
- Make sure that no folders or documents have a green or red tag.
- Choose the biggest folder/document not already tagged red or green (ie. the one with the most documents). If a folder is tagged green, the documents inside it do not need to be tagged.
- Right/Context click on the folder and choose Export Folder/File.
- If the folder exports, give the folder a green tag and go back to step 2. If the folder/document does not export, continue to the next step.
- Give the folder/document a red tag.
- If you gave a document a red tag, go back to step 2. If you tagged a folder, continue to the next step.
- Open containing folder and work through the contained folders/documents by going back to step 2.
- Are there more folders/documents to export? If yes, go to step 2, if no, continue.
- Remove all the green tags.
-
Workflow to identify problem documents (v1.9 and later)
The problem documents have now been identified and given red tags. It it now time to fix them. Go to Fixing problem documents below.
All other versions of Casedo
As noted above, this section is for users who are still using Casedo v1.8 and earlier. This means not being able to use the feature that allows you to Export individual files and folders. This is a considerably more longwinded approach and necessitates moving documents and folders to and from the Desk Space, increasing the chances of errors when rebuilding the casefile at the end of the process. Therefore it’s highly recommended that you upgrade to the latest version of Casedo first, and then use the process outlined in the section above. However, if that is not possible, this section will outline the process of identifying the problem documents without the use of the export individual files and folders feature.
As above, to identify the culprit, we need to discover which documents will and won’t export to PDF. To do this we will use the Desk Space. The reason this works is because when exporting a casefile to PDF, Casedo only exports the documents in the Index and not those in the Desk Space.
If we have documents already in the Desk Space we’re going to need to keep them out of the way, so they don’t get muddled with the other documents that we are dragging there. To do this we can create a folder, rename it Desk Space and put those documents in there.
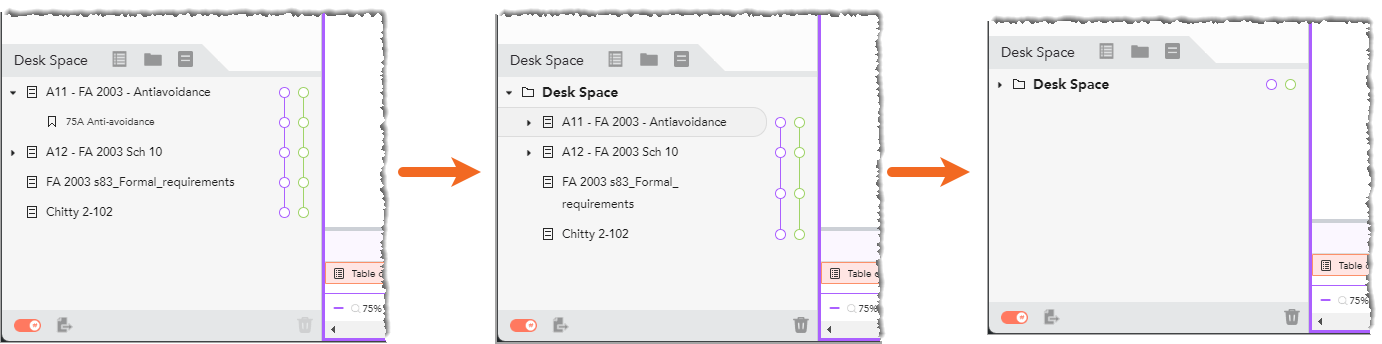
Once we’ve tidied up the Desk Space the process is simple, but can be lengthy with a large casefile. Firstly make sure that none of the documents have a green or red tag. We’d also suggest that you either make a copy of the casefile or take a screenshot of the layout in the Index so that, if you get in confusion during the process, you will have a reference point as at how the casefile looked at the outset.
Essentially you need to drag half of the casefile’s documents to the Desk Space and then see if you can export the remainder. In the case of our example casefile, I’m just going to drag out everything except the Authorities folder, as I know that it contains about half of the documents in the casefile. Once I’ve done that, I’m going to export to PDF and see if that works. If the Authorities folder on its own does export successfully, we tag it in green. If it doesn’t we need to drag half of the documents out of it, and try again. In the example, it’s successful.
If the process is successful, then we can drag in another folder or document(s) and try again. If it is not successful, then one of the documents in the casefile is problematic and needs to be identified.
To do this, create another folder in the Desk Space and rename it ‘HOLDING’. Then drag half of the documents out of the problem folder in the Index and see if they remainder export. Move the files between these two folders until the problem document has been identified. Do remember that there could be more than one document that is causing the problem.
Once you’ve identified a document that doesn’t export, it needs to be tagged in red and dragged to the Desk Space where it can be added to a new folder named PROBLEM DOCUMENTS.
Work through the the rest of the casefile until you have all the documents that do export in the Index in their correct places, and all those that don’t export in the folder PROBLEM DOCUMENTS.
Below we’ve outlined steps to identify the problem documents. Do note that during the steps it could be that Casedo crashes every time you try to export a problem document. Just restart and keep moving through the process.
Steps to identify problem documents (all other versions of Casedo)
-
-
- Check if there are documents in the Desk Space. If there are, create a folder and name it Desk Space, then drag all the documents into the new folder. You could even colour tag it (NOT green or red). If not, continue.
- Create two other folders in the Desk Space: HOLDING and PROBLEM DOCUMENTS.
- Make sure that no folders or documents in the Index have a green or red tag.
- Drag the approximately BOTTOM 50% of documents and folders into the Desk Space from the Index.
- Export the casefile to PDF.
- If the export is successful, tag in green all the top level folders and documents in the Index. Then drag 50% of the documents in the Desk Space into the Index and repeat. If the export is not successful, drag 50% of the documents in the Index into the HOLDING folder in the Desk Space and try to export again. Repeat until you have identified the problem document.
- Tag the problem document in red and drag it into the PROBLEM DOCUMENTS folder in the Desk Space.
- Repeat the above until all the documents that do export are back in the Index, organised as at the outset of the process, and all the red-tagged problem documents are in the PROBLEM DOCUMENTS folder in the Desk Space.
-
The problem documents have now been identified and given red tags. It it now time to fix them. Go to Fixing problem documents below.
Fixing Problem Documents
We have now identified the problem documents, we now need to fix them. The detective work is now complete.
As noted elsewhere, PDFs are much more complex than they look. Many PDFs, forms in particular, are made up of many non-visible layers. It is these layers that can trip up Casedo when it comes to export and some other issues. The solution is to flatten the document in question, ie. reduce the layers – in other words iron out the wrinkles.
We have discovered that much of the time this can be done within Casedo itself, using the in-built Recognise Text OCR feature. So definitely try this first. After that, we will need to try to fix the problem document outside of Casedo itself.
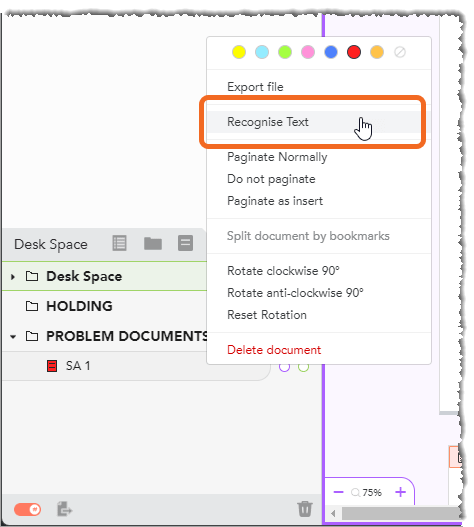
Use Casedo’s Recognise Text Feature to fix export problems
To use this, simply right-click on the problem document and select Recognise Text.
NB. OCR in Casedo takes time. Each page can take around 30 seconds to OCR, and it will not OCR more than 60 pages. If the document is more than 10 pages long, we suggest using the suggestion below for fixing the document(s).
Once completed, try to export the document in question, either individually (Casedo v1.9 or later), or as part of the main casefile (all other versions of Casedo).
Flatten or optimise the document outside of Casedo
To do this you’ll need to have a copy of the problem document from before it was imported into Casedo. Once the document is to hand try run printing it to PDF or Optimising it. Either of these measures usually work. Once the process is complete, import the document into Casedo once more and see if it exports. For more information on this, take a look at How to flatten your documents.
The disadvantage of this approach is that the new version of the problem document will not have any any of the annotations (bookmarks, links etc) of the original. They will need to be added again. One way of doing this efficiently is to put the old and the new versions of the document in side-by-side Casedo view panes and methodically run through them from beginning to end copying any annotations across. Only then should you delete the original defective document.
How to Prevent this Issue in Future
With documents being received from many parties, it’ll be almost impossible to prevent this issue from happening at least occasionally. However, is there anything we can do to minimise the risk of this happening again?
Our experience of this issue is that it’s generally forms and shorter documents that cause problems. Also those that are not OCR’d. Our strong suggestion, therefore, is to find a workflow that enables the flattening and OCRing of all documents before they are imported into Casedo.
Last Updated on March 6, 2025
First Published on June 14, 2021
Having trouble exporting a casefile to PDF? Here is a guide to get it fixed.
PDFs can be deceptive. Many of them are simply text on pages, and some have graphics embedded in them. Others still have transparent layers which may contain a variety of things including text, graphics, signatures and other objects.
Table of Contents
First Check the Basics
Getting Started
Identify the problem documents
> Casedo v1.9 and later
>> Steps to identify problem documents (v1.9 and later)
>> Workflow to identify problem documents (v1.9 and later)
> All other versions of Casedo
>> Steps to identify problem documents (other versions)
Fixing problem documents
How to Prevent this Issue in Future
First Check the Basics
Before working through the fix below check the following:
-
- Have you successfully used the export case to PDF feature before? If not, have you checked that you have done it correctly by following the steps in the article How to Export Case to PDF?
- When exporting a complete casefile, make sure that your documents are in the Index. When exporting a whole casefile, Casedo will not export any documents from the Desk Space. If you don’t know the difference between the Index and the Desk Space, take a look at Anatomy of the Casedo Workspace. This is usually the issue if you see the error Nothing in the bundle index to Export. For more information on this see How to fix “Nothing in the bundle index to Export” Error.
- Open another casefile, or even create a new one, and check that you can export from that, if you can’t:
- Check that you are exporting to a folder on your computer that you have previously exported to, and
- Check that the documents in the new casefile are exportable (ie. keep it simple).
If you can’t export other casefiles, contact us. Assuming the issue is ONLY with the current casefile, the problem is likely to be that there is a document or documents that are stopping the export taking place. The task is to identify the document or documents that are causing the problem and fix them.
With the ability to export individual folders and documents that was included in Casedo v1.9, this became a simpler process. Below we have outlined both ways of solving this problem.
Getting started
As an example, we will use a casefile with the following document structure:
You can see that the casefile is made up of a cover page, a table of contents and three folders containing documents. Two of the top-tier folders have sub-folders. What you can’t see is that the casefile is 222 pages long. The Table of Contents tells us that there are 22 documents in total.
The number of documents in the casefile is not important. However, your casefile may contain hundreds of documents. The methods below circumvent the need to check each document individually.
We are now ready to identify the problem documents. Before starting, make sure you know which version of Casedo you are using. Once you know, click the relevant link below.
Identify the problem documents
Casedo v1.9 and later
We will use the export individual files and folders feature to quickly identify the problem documents, if you don’t know how to use this feature, take a look at Exporting individual files and folders.
NB. If possible, we want to try and leave the Index organised as it currently is, this will save time later on.
The most efficient way to identify the problem documents is to first try to export the folder containing the most documents. In this case it’s the top level Authorities folder. Once we have successfully exported the folder, we can colour tag it in green (to show that it has successfully exported), and then move on to the next folder. Tagging is only used help keep track of which files and folder have been tested and which are defective. If the export is NOT successful then tag the folder in red and open it, moving through the contents exporting documents and folders to see if they export or not.
Below we’ve outlined both steps and a workflow to identify the problem documents. Both the steps and the workflow are the same, choose which you prefer to follow. At the end of the process you will have one or two documents tagged in RED that need to be fixed.
Do note that during the steps and/or workflow it could be that Casedo crashes every time you try to export a problem document. Just restart and keep moving through the process.
Steps to identify problem documents (v1.9 and later)
-
-
- Make sure that no folders or documents have a green or red tag.
- Choose the biggest folder/document not already tagged red or green (ie. the one with the most documents). If a folder is tagged green, the documents inside it do not need to be tagged.
- Right/Context click on the folder and choose Export Folder/File.
- If the folder exports, give the folder a green tag and go back to step 2. If the folder/document does not export, continue to the next step.
- Give the folder/document a red tag.
- If you gave a document a red tag, go back to step 2. If you tagged a folder, continue to the next step.
- Open containing folder and work through the contained folders/documents by going back to step 2.
- Are there more folders/documents to export? If yes, go to step 2, if no, continue.
- Remove all the green tags.
-
Workflow to identify problem documents (v1.9 and later)
The problem documents have now been identified and given red tags. It it now time to fix them. Go to Fixing problem documents below.
All other versions of Casedo
As noted above, this section is for users who are still using Casedo v1.8 and earlier. This means not being able to use the feature that allows you to Export individual files and folders. This is a considerably more longwinded approach and necessitates moving documents and folders to and from the Desk Space, increasing the chances of errors when rebuilding the casefile at the end of the process. Therefore it’s highly recommended that you upgrade to the latest version of Casedo first, and then use the process outlined in the section above. However, if that is not possible, this section will outline the process of identifying the problem documents without the use of the export individual files and folders feature.
As above, to identify the culprit, we need to discover which documents will and won’t export to PDF. To do this we will use the Desk Space. The reason this works is because when exporting a casefile to PDF, Casedo only exports the documents in the Index and not those in the Desk Space.
If we have documents already in the Desk Space we’re going to need to keep them out of the way, so they don’t get muddled with the other documents that we are dragging there. To do this we can create a folder, rename it Desk Space and put those documents in there.
Once we’ve tidied up the Desk Space the process is simple, but can be lengthy with a large casefile. Firstly make sure that none of the documents have a green or red tag. We’d also suggest that you either make a copy of the casefile or take a screenshot of the layout in the Index so that, if you get in confusion during the process, you will have a reference point as at how the casefile looked at the outset.
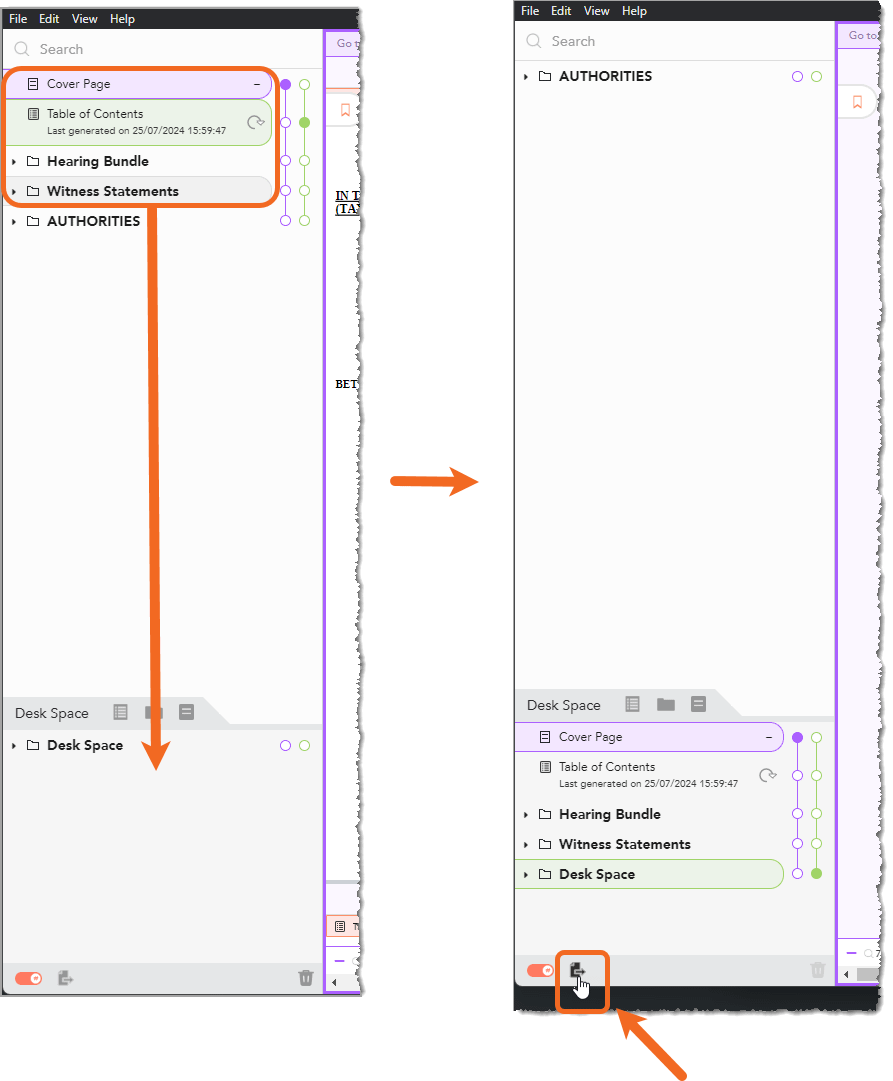
Essentially you need to drag half of the casefile’s documents to the Desk Space and then see if you can export the remainder. In the case of our example casefile, I’m just going to drag out everything except the Authorities folder, as I know that it contains about half of the documents in the casefile. Once I’ve done that, I’m going to export to PDF and see if that works. If the Authorities folder on its own does export successfully, we tag it in green. If it doesn’t we need to drag half of the documents out of it, and try again. In the example, it’s successful.
If the process is successful, then we can drag in another folder or document(s) and try again. If it is not successful, then one of the documents in the casefile is problematic and needs to be identified.
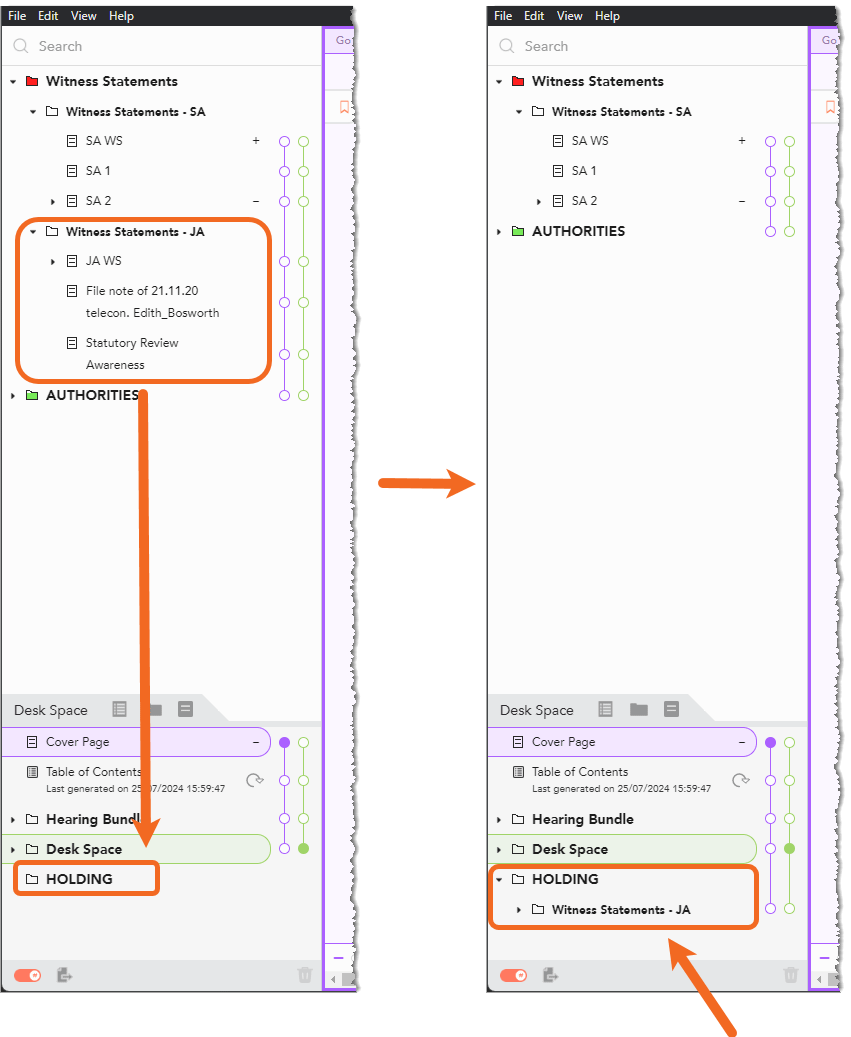
To do this, create another folder in the Desk Space and rename it ‘HOLDING’. Then drag half of the documents out of the problem folder in the Index and see if they remainder export. Move the files between these two folders until the problem document has been identified. Do remember that there could be more than one document that is causing the problem.
Once you’ve identified a document that doesn’t export, it needs to be tagged in red and dragged to the Desk Space where it can be added to a new folder named PROBLEM DOCUMENTS.
Work through the the rest of the casefile until you have all the documents that do export in the Index in their correct places, and all those that don’t export in the folder PROBLEM DOCUMENTS.
Below we’ve outlined steps to identify the problem documents. Do note that during the steps it could be that Casedo crashes every time you try to export a problem document. Just restart and keep moving through the process.
Steps to identify problem documents (all other versions of Casedo)
-
-
- Check if there are documents in the Desk Space. If there are, create a folder and name it Desk Space, then drag all the documents into the new folder. You could even colour tag it (NOT green or red). If not, continue.
- Create two other folders in the Desk Space: HOLDING and PROBLEM DOCUMENTS.
- Make sure that no folders or documents in the Index have a green or red tag.
- Drag the approximately BOTTOM 50% of documents and folders into the Desk Space from the Index.
- Export the casefile to PDF.
- If the export is successful, tag in green all the top level folders and documents in the Index. Then drag 50% of the documents in the Desk Space into the Index and repeat. If the export is not successful, drag 50% of the documents in the Index into the HOLDING folder in the Desk Space and try to export again. Repeat until you have identified the problem document.
- Tag the problem document in red and drag it into the PROBLEM DOCUMENTS folder in the Desk Space.
- Repeat the above until all the documents that do export are back in the Index, organised as at the outset of the process, and all the red-tagged problem documents are in the PROBLEM DOCUMENTS folder in the Desk Space.
-
The problem documents have now been identified and given red tags. It it now time to fix them. Go to Fixing problem documents below.
Fixing Problem Documents
We have now identified the problem documents, we now need to fix them. The detective work is now complete.
As noted elsewhere, PDFs are much more complex than they look. Many PDFs, forms in particular, are made up of many non-visible layers. It is these layers that can trip up Casedo when it comes to export and some other issues. The solution is to flatten the document in question, ie. reduce the layers – in other words iron out the wrinkles.
We have discovered that much of the time this can be done within Casedo itself, using the in-built Recognise Text OCR feature. So definitely try this first. After that, we will need to try to fix the problem document outside of Casedo itself.
Use Casedo’s Recognise Text Feature to fix export problems
To use this, simply right-click on the problem document and select Recognise Text.
NB. OCR in Casedo takes time. Each page can take around 30 seconds to OCR, and it will not OCR more than 60 pages. If the document is more than 10 pages long, we suggest using the suggestion below for fixing the document(s).
Once completed, try to export the document in question, either individually (Casedo v1.9 or later), or as part of the main casefile (all other versions of Casedo).
Flatten or optimise the document outside of Casedo
To do this you’ll need to have a copy of the problem document from before it was imported into Casedo. Once the document is to hand try run printing it to PDF or Optimising it. Either of these measures usually work. Once the process is complete, import the document into Casedo once more and see if it exports. For more information on this, take a look at How to flatten your documents.
The disadvantage of this approach is that the new version of the problem document will not have any any of the annotations (bookmarks, links etc) of the original. They will need to be added again. One way of doing this efficiently is to put the old and the new versions of the document in side-by-side Casedo view panes and methodically run through them from beginning to end copying any annotations across. Only then should you delete the original defective document.
How to Prevent this Issue in Future
With documents being received from many parties, it’ll be almost impossible to prevent this issue from happening at least occasionally. However, is there anything we can do to minimise the risk of this happening again?
Our experience of this issue is that it’s generally forms and shorter documents that cause problems. Also those that are not OCR’d. Our strong suggestion, therefore, is to find a workflow that enables the flattening and OCRing of all documents before they are imported into Casedo.
Last Updated on March 6, 2025
First Published on June 14, 2021